
Last weekend, we demo’d our basement! With the help of my parents, we were able to finish demo in just two days and completely fill a 30 yard dumpster. After ripping out the wood paneling, ceiling tiles, a couple walls and closets, and former bathroom fixtures, we have a blank slate to start fresh with a brand new layout and design.
Living Room


In the photos above, you can see the stairs leading to our first floor as well as what will be one of the bedrooms. I am standing in what will be our living room area. We took out the original wall there because we are planning on making the bedroom about two feet wider. We will rework the stairs, add an egress window, rework the bedroom layout, waterproof the walls, and add new electrical work. I’m also envisioning a dry bar with cabinets, wall sconces, and a floating shelf on the outside of the bedroom wall facing the living room area.


Maybe the original owners ran a tiny restaurant called the Basement Grill and Bar and were serious about their love for burgers. I’m not sure who thought it was a good idea to put a charcoal grill in a basement surrounded by wood paneling. Needless to say, we did not use this grill and it was one of the first things we ripped out down here! All of the wood paneling, ceiling tiles, and electrical work went into the dumpster along with the grill and bar.
In this room, we are thinking about adding an egress window (it’s not necessary like it is for the bedrooms, so this will come down to cost vs benefits), and plan on waterproofing, drywalling, new flooring, adding built-ins and a fireplace to the right side of the room, and will completely re-do all of the electrical work. Upon demoing, we found gas lines by the charcoal grill area so it will be possible to add a gas fireplace!
Bedroom One
This will be the largest bedroom in the basement. We plan on reframing the closet and moving the wall out as I mentioned earlier. We will also replace the existing egress window to make it code compliant. I’m hoping to be able to do a fun feature wall in here with either wallpaper or wood trim. We will maximize the space under the stairs by using it as a closet area and potentially adding some built-in bookshelves.


Bedroom Two
This bedroom will be a bit awkward due to all of the HVAC, plumbing, and the support beam. It’s going to have some odd drop-downs, a short door, and will be a bit small, but we will do the best we can with it. Josh is going to look into working around the support beam to try and make a taller door. We will do our best with the ceiling dropdowns and will have to get creative with furniture arrangement to minimize the risk of someone hitting their heads! We’ll also add an egress window in this room (on the wall without the plumbing) to ensure that it is code compliant as well as add a closet.


Bathroom
We nicknamed this “bathroom” the Alcatraz bathroom. It has a sink, mirror, and roughed-in shower pan. The toilet was removed when we had to do some plumbing work for our master bathroom. The giant hole is there because we had to replace the main stack and part of the drain pipe that runs out to the street. We hired that work out and don’t regret it for a second!
In this room, we will of course add a vanity and toilet, rework electrical and plumbing, and do our best to make the shower functional so we’re able to call it a 3/4 bath. We will also add a built-in storage niche next to the HVAC unit.


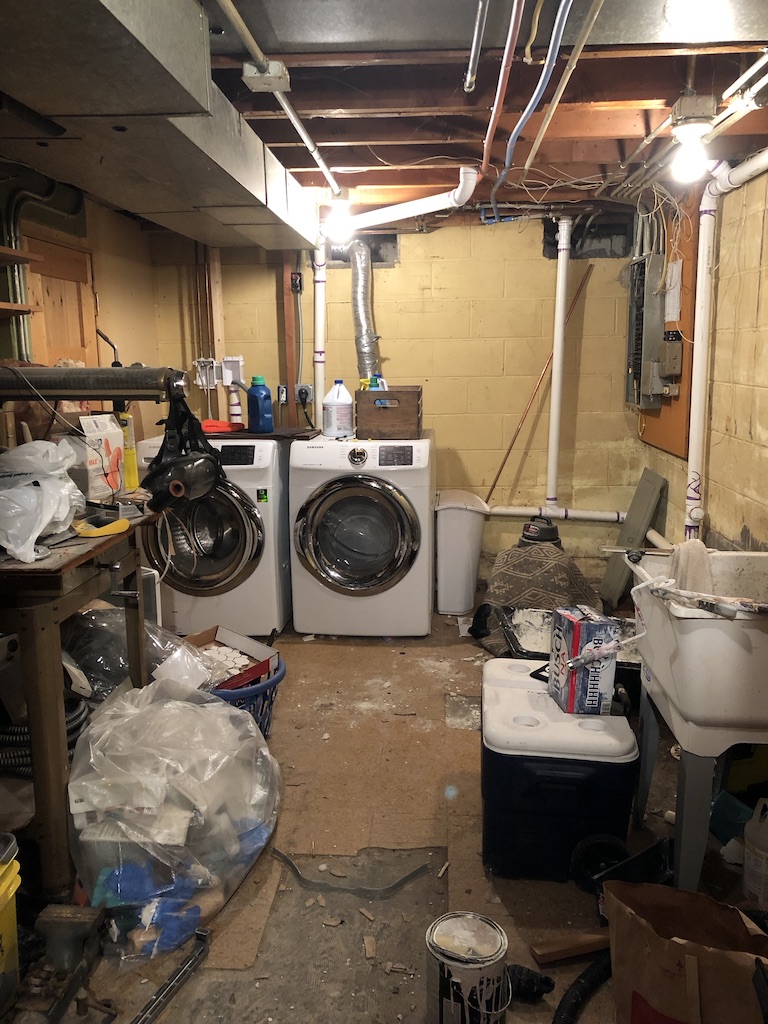
Laundry Room
When we moved in, our washer and dryer were actually in the kitchen! We re-worked the plumbing and moved the washer and dryer down to the basement. Although it works fine where it is, we’re thinking of re-working the layout. I’d love to add more storage, built-ins, and a folding area to this room as well as create a prettier laundry space and utility sink area. We also have to replace the plumbing, vent, and electrical work down here because it’s not code compliant.


As you can see, we have our work cut out for us down here. In addition to the obvious work that needs to be done, there are also a few issues we ran into that will need to be addressed before we can do any of the framing work.
Problem Areas
- Asbestos tile floors. Josh will need to abate the tile floors before we can do anything else down here. Thankfully he has experience doing this because his company does this type of work.
- Unlevel floors and huge hole in the bathroom. We will need to use a self-leveling concrete compound to level out the floors and Josh will fill in the hole with concrete.
- Cracks in walls. We will need to tuckpoint all of the cracks in the wall with cement to ensure they are fully waterproofed and stable.
- Water seepage. We have issues in two corners with water running into the basement during heavy rains. This can mostly be fixed with sloping the landscape outside and re-working the gutters to ensure there is no standing water in the corners of the house. We will also have to waterproof the entire basement and we are considering placing a sump pump or drain tile system.
- Rotted support pillars. This was an unexpected find and will be an expensive fix. Unfortunately, the support pillars are almost all rotted at the bottom and will all need to be replaced.
What we will hire vs DIY
We haven’t fully decided this yet and will plan on quotes that we get for certain jobs. In order to keep costs low, we plan on DIYing as much as possible, but will hire out a few things both because sometimes it just makes sense to spend a little more on a professional!
Work we’ll potentially hire out
- Egress windows
- Drain tile/sump system/shower plumbing
- Flooring installation (carpet in living room area)
- Drywall- although we can DIY, it would save a significant amount of time to hire out
Work we’ll DIY
- Electrical and installation of fixtures
- Easier plumbing work in laundry and bathroom
- Painting
- Bathroom tilework
- All trim and finish work including builtins
- Installation of fireplace
- Asbestos tile abatement
- Leveling of floors
- Waterproofing walls
- Replacing support pillars
- Framing walls
Next Steps
In the next month or so, we plan to:
- Obtain quotes, schedule, and install egress windows
- Abate asbestos tile
- Obtain quotes for drain tile/sump installation
- Obtain permits through the city of St. Paul
- Test for radon and install radon system if positive
- Level the floors and fill in hole in bathroom/bedroom
- Obtain quotes for plumbing shower
Ensuring that everything is permitted is high on the priority list for us. It doesn’t make sense putting time, money, and effort into finishing this space if it isn’t legal. Josh will be in charge of pulling the permits and working with the inspectors to ensure that everything we do is code-compliant and will pass inspection. We want to make this space not only functional and beautiful but also safe for ourselves and the future owners.
From before and after demo, this space has already undergone a huge transformation. We have an incredible amount of work in front of us, but I know that it will be so worth it! I’m already imagining sitting in front of the fire and looking around, taking in the cozy space and feeling grateful for all of the hard work we put in.
I plan on updating you all with each step along the way, so don’t forget to subscribe to my blog so you don’t miss a single thing!

Very nice post. Thank you for sharing this informative post about basement demo and plans. It’s very useful. Great work.
Awesome post! We are in the middle of remodeling our basement as well. How are you planning to fully waterproof?
Thanks, Lora! That’s awesome, how exciting for you guys! We are not entirely sure yet, to be honest- still nailing down logistics. We’re thinking that re-sloping the landscape will help significantly, as well as filling any cracks in the foundation and adding a coat of Redgard waterproofing paint. We’re going to get a quote on drain tile, but we aren’t sure that’s entirely necessary.
I’m really excited to follow you on this journey! I also live in a 50s ranch with an unfinished basement and it’s starting to feel like time to figure out what to do with it. I’m curious, what’s the height from your basement floor to the bottom of the floorboards?
Sounds like we’re in a similar boat! Our ceilings are only 6’8″ down there, so dealing with that will be one of our biggest struggles!
I close on my one owner1955 Ranch today!!!! So tomorrow begins my reno life. Glad I found your blog. You giving me tons of inspiration. You two are super talented and reno Beasts!!!! Keep the updates coming!!! I’m going to be needing reminders of the end results daily😊
Ahh I love hearing that, thank you SO much for being here! Best of luck on your reno!!!